
Connecting a Custom Domain
In this article, you'll learn how to connect a custom domain to your Help Center portal, configure DNS at your domain provider, and troubleshoot common setup issues.
How custom domains work
Every Help Center starts with a default URL on help.enjo.ai. You can replace it with a custom domain.
For example, help.yourcompany.com
This makes sure that portal lives on a URL that matches the rest of your product.
Three things happen when you connect a custom domain:
You add a CNAME record at your DNS provider pointing your subdomain to
help.enjo.ai.Enjo verifies the record and provisions an SSL certificate for your subdomain.
The default
help.enjo.aiURL permanently redirects (301) to your custom domain.
The redirect is mandatory once the domain is verified. Search engines need a single canonical URL for SEO — serving the same content at two URLs splits your search ranking and confuses indexing.
Subdomains vs. root domains
Enjo requires a subdomain (help.yourcompany.com), not a root domain (yourcompany.com). CNAME records cannot be set on root domains due to DNS protocol limitations.
If you want your Help Center at your root domain, redirect the root to your Help Center subdomain at your web host or CDN.
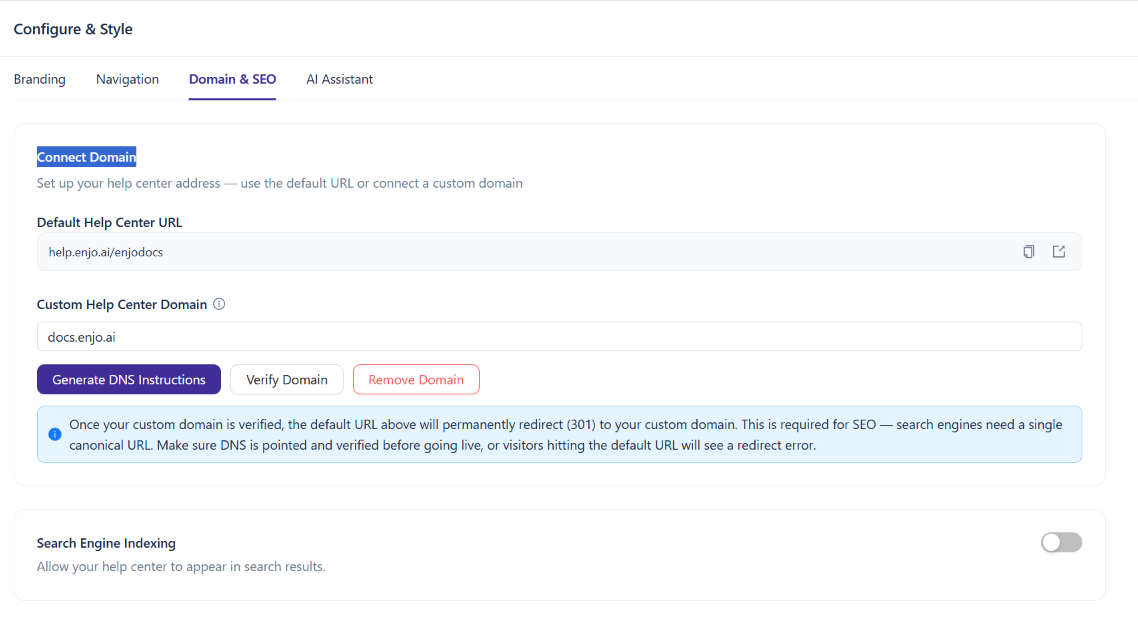
⚠️ Make sure DNS is pointed and verified before going live. The default URL redirects the moment your custom domain is verified if DNS isn't resolving yet, customers hitting the default URL will see a redirect error.
Setup
Step 1 — Enter your custom domain
Go to Help Center > Configure and Style > Domain & SEO.
Under Custom Help Center Domain, enter your subdomain — for example,
help.yourcompany.com.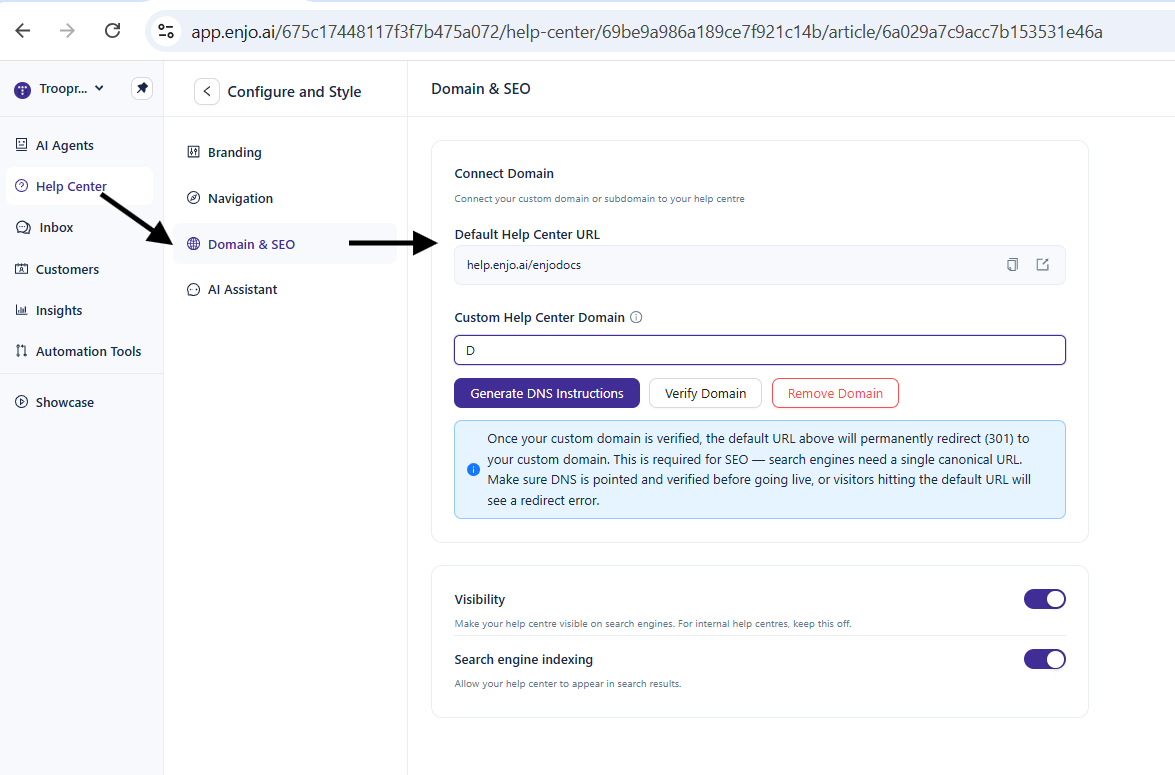
Step 2 — Generate DNS instructions
Click Generate DNS Instructions.
A modal opens with the exact CNAME record to add at your DNS provider:
Field | Value |
|---|---|
Type | CNAME |
Name / Host | Your full subdomain — for example, |
Relative name | The subdomain only, without the zone — for example, |
Value / Points to |
|
TTL | 300 (5 minutes) |
Copy the values you'll need at your provider.
💡 Most providers either accept the full host name or strip the zone automatically — never both. Try the relative name first. If the record doesn't resolve, switch to the full host name.
Step 3 — Add the CNAME record at your DNS provider
Log in to your domain registrar or DNS provider and add the CNAME record.
Step 4 — Verify the domain
Return to Domain & SEO in Enjo.
Click Verify Domain.
Enjo checks the CNAME record and provisions an SSL certificate. DNS typically propagates within 5–15 minutes. SSL provisioning takes a few minutes after verification and can take up to an hour in some cases.
Once verified:
Your portal is reachable at the custom domain
The default
help.enjo.aiURL redirects (301) to your custom domainSSL is active
Provider-specific instructions
The CNAME record values are the same regardless of provider — only the UI for adding it differs. Use the values from Step 2 and follow your provider's official documentation to add the record.
Provider | DNS documentation |
|---|---|
Cloudflare | |
GoDaddy | |
Namecheap | |
Squarespace Domains | |
Amazon Route 53 |
⚠️ Cloudflare only — turn the proxy off (gray cloud, DNS only) for this CNAME record. If the proxy is on (orange cloud), it will conflict with Enjo's SSL and cause redirect loops. Contact Support if you need help resolving this issue.
Troubleshooting
DNS hasn't propagated
DNS typically propagates within 5–15 minutes but can take up to 48 hours globally.
Check whether the CNAME is live from your terminal:
dig CNAME help.yourcompany.com
The answer section should show help.enjo.ai as the target. If it doesn't:
Wait 10–15 more minutes and retry
Confirm you saved the record at your DNS provider
Confirm you're editing the correct DNS zone — if the domain is registered at one provider but DNS is managed at another, the record needs to be on the provider that controls the zone
"Too many redirects" error
This is almost always a Cloudflare proxy issue. Cloudflare is trying to terminate SSL on top of Enjo's SSL, causing a loop.
Fix: open the CNAME record in Cloudflare and switch Proxy status to DNS only (gray cloud).
SSL is pending or invalid
Enjo provisions a certificate automatically once the CNAME is verified. This usually takes a few minutes but can take up to an hour.
If SSL is still pending after an hour:
Check for a CAA record on your domain. If a CAA record exists and doesn't include the certificate authority Enjo uses, the certificate can't be issued. Either remove the CAA record or add Enjo's CA to it. Contact Enjo support for the CA name.
Confirm the Cloudflare proxy is off for the CNAME record.
Confirm there are no conflicting A records on the same subdomain.
Wrong record type
Enjo requires a CNAME. Common mistakes:
A record pointing to an IP — won't work. Enjo's IPs are not static. Use a CNAME.
CNAME on the root domain — not allowed by DNS protocol. Use a subdomain like
help.yourcompany.com.ALIAS or ANAME record — works at some providers but support is inconsistent. Use a CNAME on a subdomain unless you have a specific reason.
Redirect error on the default URL
If the default help.enjo.ai URL shows a redirect error, your custom domain is verified but isn't resolving.
Fix: confirm the CNAME is live using dig as above. If DNS is broken, the redirect target is also broken.
⚠️ The default URL begins redirecting the moment the custom domain is verified. If DNS later breaks, the default URL stops working too. Treat the custom domain as the canonical URL once verified — don't link to the default URL anywhere.
Verification keeps failing
If Verify Domain repeatedly fails:
Confirm the CNAME points to
help.enjo.aiexactly.Confirm the record is on the correct subdomain — typos in the host field are the most common cause.
Wait 10–15 minutes for propagation.
If your provider has DNSSEC enabled, confirm it's not blocking the record.
If verification still fails after 30 minutes with a correct CNAME, contact Enjo support.
What's next
Configuration and Branding — Configure logo, colors, navigation, and the AI Assistant widget.
Creating and Managing Content — Create articles, organize them into collections, and manage the publishing lifecycle.