
Creating and Managing Content
In this article, you'll learn how to create articles in your Help Center, generate them with the Help Center Agent, organize them into collections, manage the publishing lifecycle, and configure article settings for SEO.
How content creation works
You create articles in two ways:
Manually — open a blank article and write it using the block editor.
With the Help Center Agent — describe what you want and the agent drafts the article using your website, connected knowledge sources, and resolved support interactions as source material.
Articles live in Collections and move through three states: Draft (saved, hidden from the portal), Published (live in the portal), and Unpublished (returned to draft, removed from the portal).
Creating articles manually
Open a new article
Go to Help Center from the left navigation.
Open the collection where you want the article to live, or create a new collection first.
Click + next to Articles in the left navigation.
Enter a title. The article is saved as a draft immediately.
Use the block editor
The block editor builds articles from individual content blocks — headings, lists, callouts, media, and more.
Type / anywhere in the editor to open the slash command menu.
Category | Blocks |
|---|---|
Basic | Text, Heading 1/2/3, Bullet List, Numbered List, Code Block, Blockquote, Divider |
Structure | Toggle List, Tabs, Table |
Media | Image, Video, Audio |
To convert an existing block, select it and use the slash menu, or use keyboard shortcuts — for example, # + space for Heading 1.
Add images
Type
/imageand select Image.Drag a JPG, PNG, GIF, or WebP file into the upload area, or paste an image URL.
Click Insert image.
Uploaded images are stored with the Help Center and embedded in the article.
Embed video and audio
Video — type
/video, paste a YouTube URL, and click Insert video.Audio — type
/audioand upload an audio file.
Use tables, tabs, and toggle lists
Table — for comparisons, settings references, or specifications.
Tabs — when the same task differs across platforms or roles — for example, Slack vs. Teams.
Toggle List — for collapsible sections like FAQs or optional advanced details.
Organizing content with collections
Collections group related articles into the structure of your Help Center.
Create a collection
Go to Help Center.
In the left navigation, click + next to Articles.
Select New collection.
Enter a name — for example, "Getting Started," "Billing," or "Troubleshooting."
Optionally add a description shown on the collection landing page.
Move articles between collections
In the left navigation, hover over the article.
Click ··· and select Move to.
Pick the destination collection.
Reorder articles and collections
Drag and drop articles and collections in the left navigation to reorder them. The order applies to the public Help Center portal.
💡 Keep collection names short and outcome-focused. "Setting up your account" is clearer than "Account."
Article lifecycle
Each article moves through three states:
State | Visible in portal? | How to reach it |
|---|---|---|
Draft | No | Default state when an article is created or unpublished |
Published | Yes | Click Publish in the article editor |
Unpublished | No | Click the dropdown next to Publish and select Unpublish Article |
Publish an article
Open the article in the editor.
Click Publish in the top right.
The article goes live in the portal immediately.
Unpublish an article
Open the published article.
Click the dropdown next to Publish.
Select Unpublish Article.
The article returns to draft state and is removed from the portal immediately.
⚠️ Unpublishing removes the article from the portal but does not redirect its URL. If the article was indexed or shared externally, visitors will see a 404. Add a URL Alias to the replacement article when consolidating content.
Article settings and SEO
Click the gear icon in the top right of the article editor to open the Settings panel.
Information
View article metadata — author, creation date, last updated date, and last updated by.
SEO settings
Setting | What it does |
|---|---|
URL Slug | The URL path for this article. Auto-generated from the title. Edit to make it shorter or more descriptive. |
URL Aliases | Old slugs that permanently redirect (301) to this article. Useful when renaming an article or migrating from another tool. |
Meta Title | The title shown in search engine results. Keep it under 60 characters. |
Meta Description | The description shown in search engine results. Keep it under 160 characters. |
Search Preview | A live preview of how this article will appear in Google and other search engines. |
Hide article | When enabled, the article is excluded from collection listings in the portal. |
Set a meta title and description:
Open the article and click the gear icon.
Under SEO Settings, enter a Meta Title (under 60 characters).
Enter a Meta Description (under 160 characters).
Review the Search Preview to confirm how the article will appear.
Changes save automatically.
Add a URL alias:
When you rename an article or change its slug, add the old slug as an alias to prevent broken links.
In SEO Settings, find URL Aliases.
Type the old slug and press Enter.
Click Add.
The old URL now redirects (301) to the current article.
💡 Fill in the Meta Title and Description before publishing. A clear, specific meta description improves how your articles appear in search results.
Agent Activity log
The Agent Activity log records every conversation you've had with the Help Center Agent — for both new articles and updates.
Open the activity log
Click Help Center Agent from the left navigation.
Click Agent Activity.
Each entry shows the prompt, the article it produced or updated, the source (template or free-form), the message count, and when it ran.
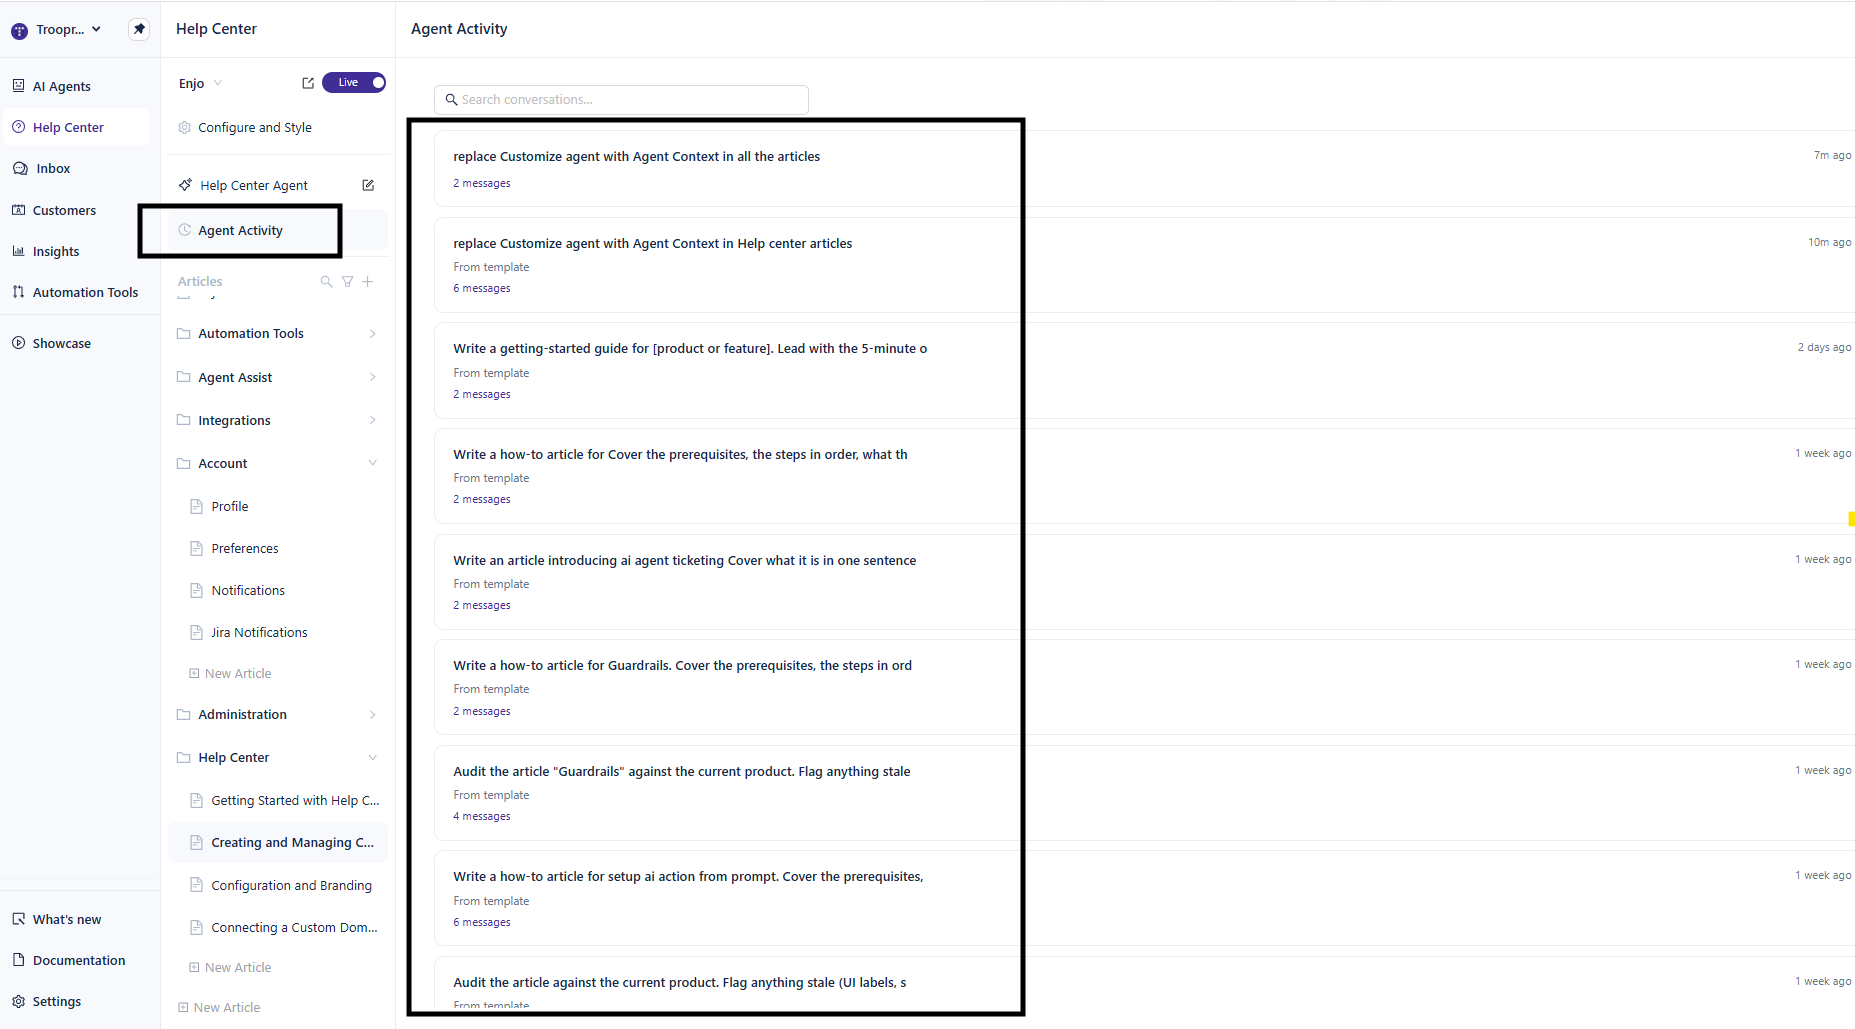
Use the activity log to:
Trace how an article was generated and what source material the agent used
Re-open a past conversation to continue refining a draft
Audit content provenance for compliance reviews
Use the search bar at the top to find specific conversations.
What's next
Configuration and Branding — Set up your logo, colors, domain, and customer-facing search widget.
Connecting a Custom Domain — Add your own domain to your Help Center portal.